Pulling it out from under the Mattress...so to speak.

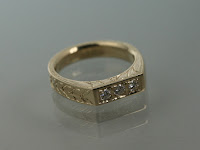
 I headed to the table yesterday and was greeted by 2 ring blanks screaming to be completed. After all, we originally casted them in 2002. Unbelievable right? Especially considering they were in 14K yellow Gold. You would have thought we'd have used them by now. The good news is...when we originally cast them the gold market was $310 . So we tucked them under our mattress so to speak and they have since quadrupled their value before I even begin. The even better news......I have improved my skills in engraving so much I can really make something of them now.The perfect Blank canvas ready to be primed and painted
  |
| For more of the steps involed hit the play button below.... |
Step one is to clean the blanks.When I found them, they were so old they hardly look like gold and they actually are from the days when we hand carved every wax. So I sand and polish my blanks to a nice clean surface.I find no matter the finish you want in the end...a perfect polish is the best ground to stand on .
I decide as I am polishing that one is calling for a classic wheatleaf design and three bead set diamonds on top.
Step two is to focus in on the wheatleaf. I love this patterns.The fascinating part of engraving is that the right pattern of the right cuts can create these natural leaf shapes. press play to enjoy the steps here...
Step three is to bead set the diamonds. Challenge... I always lean on my talented husband here. He is our masterful stonesetter but as busy as it gets around here It's time I learn so this will be my first bead set.
1: Mark and drill pilot hole
2: Open hole with a bud bur to fit diamond
3: Create seat with setting bur
4: Cut Beads with Round graver and anglet
5:Push Beads over with Round Graver, clean up seat to fit
6: Bead with beading tool
7: Bright cut and your done | For more of the steps involed please hit the play button |
Today is a good day...I learned something completely new! Now to finish, I engrave the sides with a cool little beaded and leaf pattern to change it up a bit. I hope you enjoyed this project as much as I enjoyed creating i.I definately look forward to showing you where I take ring blank #2.OneHint....It's definately gonna have some bead sets in the design....
Thanks for enjoying this post!
Kathryn Holton Stewart
 |
| I Did it!!!! That was so very satisfying, I always want to set diamonds into my patterns.....now I can! |


Nicely done! That is quite the transformation and I love the process shots.
ReplyDeleteBeautiful! and i love the idea of re-purposing your scraps. i'll definitely have to steal that when i have collected enough to make it worth while.
ReplyDeleteStunning!!! I miss being around the creative process and especially the big "unveiling" at the end of the day! You are so talented, Kat:)
ReplyDeleteBeutiful work (and thanks for documenting the various steps).
ReplyDelete